Monday, January 7, 2013

Owl and the Cat - Sewing Projects

(Note: This is the newest of four posts today which cover the Christmas season of craft)
For my baby nephew for Christmas I sewed this owl toy inspired by the design in the book 'Simple Softies', however I made changes such as the use of cotton fabrics instead of felt (except the wings remained felt for functional purposes)


Also from the same book, I redesigned these simple cat toys which I modified to become Christmas decorations. I made a black one for my sister who has a black cat Satie, and a more colourful one which is closer to the design in the book. I never follow the instructions in the design books for some reason, but rather create something based on the pictures with little reference to certain steps of the instructions.
The faces are hand-embroidered and the bodies sewn together on my sewing machine. I also slip-stitched the ribbons and stuff to the pink cat. I disemboweled an unused cushion to use for stuffing.


-AlbusOwner

Painted House Sign

For my parents for Christmas, I finally got round to making a sign for our house!

When we first moved here four years ago we named the house 'Manderley' from the classic book Rebecca. [Spoilers] Yes, in the book Manderley burns down. It wasn't my decision to call our house after that! But it's still a very pretty name.

I wanted a sort of rustic aesthetic. I began with a bare plank of wood that I acquired when some builders were doing some work around the place. The guy was nice enough to sand it down for me which created a great smooth surface to work on.

I kept reading on the internet that it is important to pre-treat the wood, but I skipped this step. If you want to do this professionally, then I suggest you research elsewhere for pretreatments. I used white acrylic paint to cover the surface with two coats and then mixed the white with blue to create a pale vintage colour for the lettering. After the lettering dried I went over the letters with a smaller brush to fix up any wobbly lines.


 For the lettering I used Script MT Bold font on a word document, then printed it out and cut it out to create a stencil. I penciled in the lettering and then painted over.

I also downloaded a leafy design and used the same method for painting around the edges.


There's still some post-treatments to do to protect it from the elements as it will be sitting outside for years to come, so I will try to remember to take pictures when it is up on our house!

-AlbusOwner

Zelda Triforce

So this is a bit of a weird craft. I made this present for my brother, a pot for his plant with the Hyrule symbol painted on.

This is one for the Zelda fans!

I printed a picture of the insignia and cut it out to create a stencil. As the pot was ridged I knew it was a bad idea to use it as a stencil for painting, so I outlined the insignia with a fabric marker, and then painted following the lines. I'm surprised it turned out so well with all the ridges, but I think it looks quite neat :)


Who doesn't want the Hyrule symbol painted onto their pot plant?!

-AlbusOwner

Hobbit Hole craft

I have a lot of catching up to do with my posts, so here we go!!

With the release of The Hobbit: An Unexpected Journey, I have been delving into a number of hobbit crafts. My first project was Bilbo's sign for Bag End. I tea-dyed the paper with 6 teabags left for 20minutes to create a light shade of old-looking parchment. I then used a calligraphy pen of two sizes to spell out the lettering which I just copied from a still from the movie. (I found the full calligraphy set in an opp shop a few years ago for just $2. No regrets!)


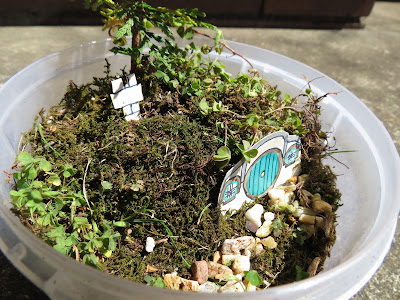
My second project was a real-growing miniture hobbit hole!! It's based of this fabulous original tutorial: Make a Miniture Hobbit Garden.

I began with a base of some glass beads that were just lying around in my room, then with a large layer of potting mix. I uprooted a little plant that was growing in one of our garden pots and replanted it into my hobbit garden. I also uprooted some moss growing around in the shady parts of our backyard. [note: since these photos, the moss has mostly withered. I am not an expert in gardening, but I believe moss requires more water than most plants.]


Final touches include a hobbit door/windows and a chimney. The door is just a piece of cardboard that I designed and coloured [note: the colour in inky pens will run (I learned this the hard way), so using pencil will ensure more long-lasting colour. Look at the original tutorial for a much better solution anyway with clay and paint!]

The door leans against the side of the little mound, but the chimney is attached to a toothpick and secured into the ground.


I hope you enjoyed my Hobbit tutorials!

-AlbusOwner

Thursday, December 6, 2012

Framed Christmas Decorations


It's that time of year again! I've been getting into the Christmas spirit with some decoration-making!

First of all, here's a video tutorial/recap of the project:

Festive cardboard cut into squares:
Photos glued onto cardboard:
  
Newspaper rolled around skewer to ensure a consistant width (this will be the frame)
Decorate the frames however you like - I used crayons and glued buttons. Then glue the frame around the edge of the photo/cardboard:


Here are some of the finished results:


Even Bilbo Baggins made it onto our Christmas tree ;)

Monday, November 5, 2012

Disney Cards

So I decided to make a bit of a different style of blog today.


A week or so ago I shot a film of myself making some Disney-inspired cards and have now compiled it into a 3-minute video. I am merely experimenting with this format, I shall wait and see if there will be any more of this kind of thing :)

Here are some more pictures of my card-making-ness:

Princess Tiana [Princess and the Frog]:


And no the dots are NOT meant to be her face!! It was a sad moment after hours and hours of work to realise she had a funny-looking face-like face...

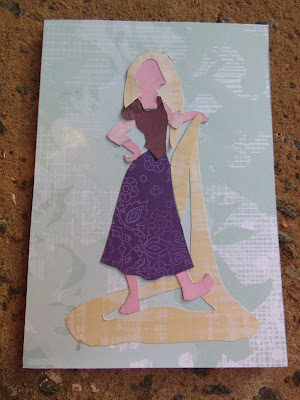
The Rapunzel one didn't turn out so well.... I hat a lot of issues with the hair, especially with the way everything was layered... I've actually un-glued and re-glued a lot of this card since these pictures/video haha!

Princess Rapunzel [Tangled]:


I apologise to everyone who I told off for talking in the background of my typewriter footage, but I can get rather fixated when doing creative stuff and doing it properly... the footage didn't turn out so great anyway so whatever!


Right now I am quite frustrated, after researching to make sure that Louis Armstrong's song  "I Can't Give You Anything But Love" was old enough to have no more copyright, I still got slammed on youtube for breaching copyright T-T

I could have taken the liberty of using a modern cool song which would definitely have breached copyright in hope of attracting more viewers, but no, I still get in trouble for using aged-songs that no-one alive can honestly take credit for!

One day I'll do something right, one day...

Signing out,
AlbusOwner

Tuesday, October 16, 2012
Study Break Craft

So I'm currently in the middle of my final school exams, the HSC.

I thought it would be a good study relief, and friendly exercise, to make some good-luck cards for all my friends :)


Each card has a patterned paper backing, and the front has a short message of encouragement and fun stickers and stencil-drawings and clips! They also have a string of buttons and pendents, either their name letter or something random (why would a packet have three O's and a number of obscure letters like Z, but no ordinary K's, C's, J's or N's?!)

Here are some of my favourites. I just love patterned paper :D


An excellent relief from study, however now I'm fully in the academic zone :) 2 exams down, 5 to go!

-AlbusOwner